Learning how to build paths within Planet Zoo is essential to the game engine, as you are creating the pathways for which guests, staff and buildings can flow.
If you’re like me and you’ve gotten frustrated at using the path system in Planet Zoo, this guide should clear up the different options and how to build paths quickly.
Type of Paths
There are three different types of paths in Planet Zoo.
- General Path: guest and staff can use this path type. There are also natural path styles that are barriers rather than paths that are paved or use gravel for example.
- Queue: this type of path is purely used for transport systems and will link up with the entrance.
- Staff Only: these paths only allow staff members to have access. They’re great for leading your staff to staff facilities that are placed out of the guest’s view. Discover how to hide staff facilities here.
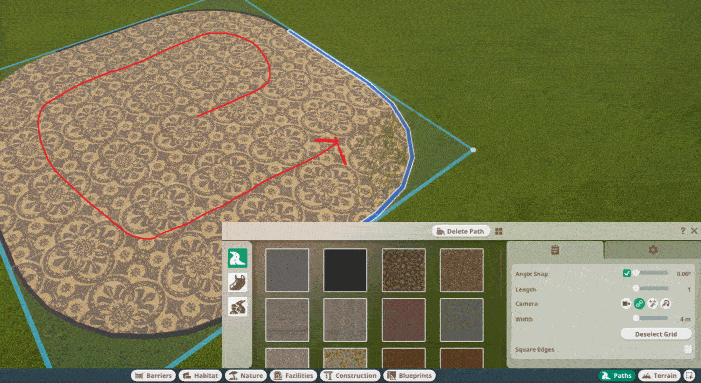
Path Menu
Angle Snap: turn off angle snap to get a more free flowing path or leave angle snap on to give your path a more structured and rigid layout. You can adjust the increments that the path will snap to when altering the amount of degrees next to the checkbox. Use 90 degrees snapping to get a more squared path layout. Pressing the space bar will switch angle snapping on and off.
Length: this option adjusts the length of the path you’re placing down.
Camera: flicking between the camera options will change how the camera positions its self as you build paths within your zoo.
Camera moves freely: will allow you to move the camera when appropriate to do so. If you do not manually move the camera, it will remain in the same position as you build.
Camera will follow: will move in the direction of the path you’re building.
Follow and centre: will keep the camera moving around so that the path you’re about to place will always be in the middle of your screen.
Follow and rotate: will follow the placement of your path and rotate the camera angle to the perspective as if you were walking along the path you’re placing.
Width: this option adjusts the width of the path you’re placing down. Use wider paths in areas where you expect there to be lots of guest footfall.
Advanced Path Menu
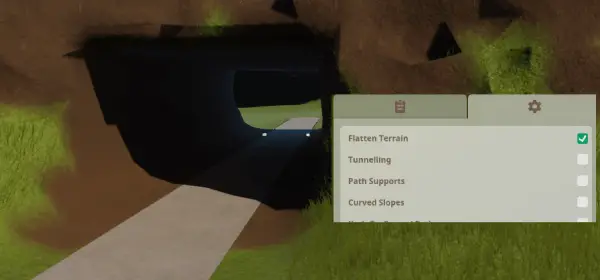
Flatten Terrain: will place a path at the same height, flattening any terrain in its way, such as hills.
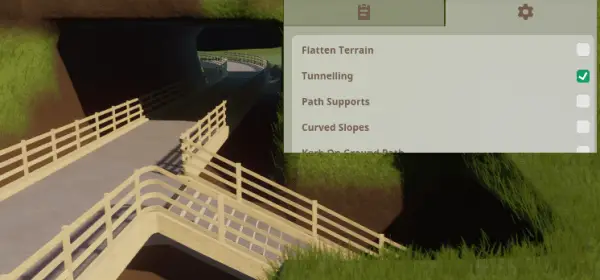
Tunnelling: will try to keep the terrain the same surrounding the path, but will build a tunnel within any terrain that may be in the way.
Curved Slopes: will allow your to curve your pathways when creating a staircase into the air or down towards the ground. This allows you to create helix type pathways within your zoo.
Kerb On Ground Path: will allow you toggle on and off the kerbs on the path you’re placing. This can often look nice when your paths are weaving through garden areas.
Railing On Elevated / Ground Path: this will add a railing to the side of your path ways. Each path style has different styled railings.
Snap Alongside Barriers: will ensure the path you’re placing down is as close to a habitat barrier as possible, leaving an equal neat distance between the barrier and path being placed down.
Read more about barriers in our building barriers guide.
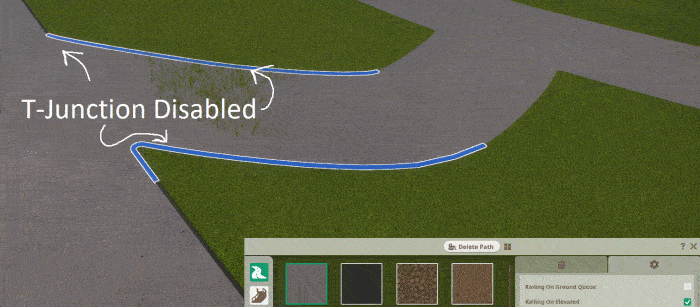
Use T-Junction When Joining Paths: will connect paths together with a more direct approach where they meet, rather than joining with a slant. See image below.
Creating Plazas Or Big Paved Areas
Begin placing a path, and enable the Align To Grid option.
If you then start building from the path you’ve just placed, you can select each square in the grid to begin building your plaza area.
There is a Square Edges option that you can turn off and on to adjust whether you’d like the corners to curve.
Path Tips, Tricks & Shortcuts
To delete paths quickly: you could right click on each piece of path, or you could hold the Delete key and left click drag along the path that’s placed to demolish it quickly.
Z: gives a straighter edge when connecting at a junction, toggles the T-junction advanced path option.
Stairs: can be built in Planet Zoo by holding down left click and moving your mouse up or down. This will allow you to build upwards creating elevated paths.
Shift: hold shift and move your mouse up to begin building elevated pathways in mid-air. You can connect a staircase at a later time.
Practice Path Building
As we know, the path tool is quite confusing and often frustrating at times. I recommend starting a sandbox game mode in Planet Zoo and just practice getting used to all of the different options within the path building tool. The more practice you do, the more you will really understand what each option is capable of doing. This will no doubt significantly improve the ways in which you create or continue creating within your zoos.
Remember, be patient, and try and think logically about the ways in which you’re placing paths.